Wednesday, September 30, 2009

Favorite Oatmeal Chocolate Chip Muffins *heather


I like to have something "danishy" with my coffee in the morning. My ultimate treat is a chocolate chip muffin from DD on a Saturday morning when I'm just beginning a 24 hour work weekend. Budget and nutritional concerns prompted me to find a recipe to make muffins at home to save money, and guilt while still enjoying a treat. I like this recipe because it has less fat and more fiber. On occasion I toss a tablespoon of flax meal or wheat germ into the mix to give it a little more nutritional payout. Even on its own it offers a great deal of fiber. The muffins don't rise that well and tend to be a little dense as a result - but I think that this can be blamed on the whole wheat flour that I use.

Ingredients:
1/2 cup butter or margarine
3/4 cup packed brown sugar
1 egg
1 cup all purpose flour
1 tsp baking powder
1/4 tsp baking soda
1/4 tsp salt
3/4 cup applesauce
1 cup rolled oats
1 cup semisweet chocolate chips
(I think Trader Joes makes the BEST choc chips.)
Raw cane sugar to sprinkle on top. About two tablespoons.


In a small mixing bowl combine flour, baking powder and soda and salt. Use a whisk to thoroughly blend ingredients. I use this method also when a recipe calls for the dry ingredients to be sifted.


In a large mixing bowl cream butter and sugar. Beat in the egg.

Add dry ingredients alternately with applesauce to the creamed mixture.


Stir in oats and chips.
Fill greased or paper-lined muffin tins about 3/4 full.


Sprinkle top of muffins with the raw, chunky sugar.

Bake at 350 degrees F for 25 minutes. Makes 18 muffins.

*credits for this recipe
Friday, September 25, 2009

Cous Cous Concoction *melissa

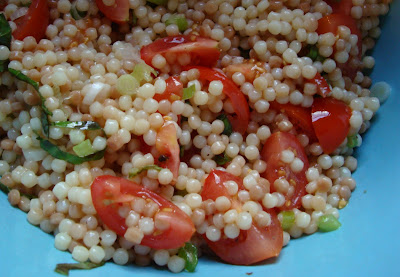
I made a wonderful discovery the other day -- Israeli Cous Cous. It's delicious...mouth watering creamy pearls of pasta that roll around delightfully on the tongue before sliding down the throat to find their ultimate destination in your belly. Unlike Moroccan cous cous, which has a much finer consistency, and according to Nate--no taste, Israeli cous cous is about the size of pepper corns. In general, I'm a big fan of cous cous but I can now say that this is my favorite type.

Ingredients for a tasty concoction:

Israeli cous cous
cherry tomatoes
scallions
basil
black pepper
olive oil
red wine vinegar

First, determine service size for cous cous and measure out accordingly. Then heat a couple tablespoons of oil in pan, pour in cous cous, and stir until coated and lightly toasted.

Then add water or chicken stock according

to amount of cous cous used. Bring to
boil then cover and reduce to gentle boil
for about 15-18 min.


While your cous cous cooks prepare the rest of your ingredients...half or quarter tomatoes, chop scallions...


Julienne the basil....


(My sisters were the ones born
with the
pretty nails, I got the
wide, flat nail beds....)

I digress. if you've never used this
method to chop leafy
herbs...give it a try
.

Combine these ingredients....


Then combine with cous cous. Mix olive oil, a splash of red wine vinegar, and fresh cracked black pepper in bowl, pour over cous cous and stir to coat.


Then, serve with whatever you like!

Thursday, September 24, 2009

Lime, Dill and Mustard Dress Up Grilled Chicken *heather

I have fond memories of time spent with my grandparents at their home in Lancaster county. They lived on a ridge overlooking a valley; an idyllic setting. I loved sitting on their front porch and gazing over the valley at dusk, watching the shades of light play on the rolling valleys in the distance as the different colors crept into the sky.

Grandma was a fantastic cook, and very precise hostess. Her table was always neatly and perfectly set. I remember special little touches to meals - like sweetened, shredded coconut sprinkled on top of a simple fruit cup; a trick I often use now in order to brighten up a routine side dish to a meal. I say she was a fantastic cook because she doesn't cook much anymore. She is still available with treasures of great recipes and cooking advice though, and I try to pick her brain sometimes for something new to try.

Grandma had a knack for making a few comfort food dishes. I remember her potato salad and still wish I could master it's zesty goodness. She would melt red hots into applesauce for a tasty side dish and her Christmas cookies were always unique and tasty. I'm getting closer to the recipe, I promise.

One summer evening we grilled on their back porch. She basted her chicken with Helmans Dijonaise. I'm not sure if Helmans still even makes this product, but I make my own version of this dressing to fancy up a simple chicken breast.

Two boneless, skinless chicken breasts. Rinse and pat dry. (I like to take the big, fat breasts from the grocery store and slice them in half, to make two thinner breasts. They take less time to cook that way, and make a more healthy portion.)
2 Tbsp Dijon style mustard
2 Tbsp Mayonnaise
2 Tbsp Olive Oil
a few sprigs fresh dill, chopped or 1 tsp dried dill
1 Tbsp lime juice
* a little disclaimer here: I estimated the quantities for the ingredients because I usually add a little dash here and an extra pinch there until it looks right. I haven't made this in more than two months, so my memory is a little foggy.

In a small bowl, whisk the ingredients together. Use half the dressing to marinate your chicken, reserve the remainder to use when grilling. Since I tend to throw dinner together at the last minute, my chicken usually marinates for only the 10 minutes it takes for the grill to heat up, but you could let it sit all day in this marinade in the fridge, or up to 30 minutes at room temperature.

Place the boneless chicken breasts on an upper rack of the grill. Discard the dressing used to marinate the chicken. Brush the reserved dressing on the upper side of the chicken. The thickness of the breasts will determine how long you cook on one side. I usually flip after 5 minutes, brushing the dressing again over the upper side. You should grill the breasts until the juices run clear, being careful not to over cook them, or they will dry out.

I served the chicken with a baked potato and grilled zucchini. These can also be done on the grill, though the potato will need a much longer time to cook. The zucchini can be tossed with some olive oil and salt and pepper, maybe a little red wine vinegar and garlic powder. Make a packet of of tin foil and place on the grill with the chicken.


Rosted Grape Tomatoes *heather

Our weather has been kind to us and our tomato plants this summer. As a result, we've become creative with our tomato enjoyment so that our prolific crop doesn't go to the mold and rot. As you may know, life has been in a bit of an upheaval for our family recently. Consequently, time and energy for cooking is scarce. We have been enjoying the generosity of our brothers and sisters from church as they provide meals for us 4 days-a-week. On Tuesday this week we enjoyed a friend's meatloaf and mashed potatoes. (Thanks Poes!) As I put the meatloaf in the oven to cook, the overflowing basket of tomatoes on the counter caught my eye and I decided that they would make the perfect addition to a tasty meal. As I mentioned earlier, time and energy are scarce, but popping the tomatoes in to roast with the meatloaf takes very little time or thought.

Ingredients:

~Grape Tomatoes - about a handful for each portion
~Olive Oil - enough to coat the tomatoes.
~Salt and Pepper and any additional seasoning that suits your fancy. I used a garlic/onion/bell
pepper/parmesan blend that I have in my cupboard.

In a medium bowl toss tomatoes with olive oil and season, gently stirring until tomatoes are evenly coated with oil and seasoning.


Line a rimmed baking sheet with aluminum foil, places tomatoes on sheet. Use a rubber spatula to scrape out all the extra oil and seasoning, drizzle over tomatoes.


Roast tomatoes in a 350 degree oven for about 20 minutes, or until the skin starts to split.


If you're pressed for time, you can roast in a hotter oven, just don't make the mistake I did. When the meatloaf finished, I took it out of the 350 oven to rest and put the tomatoes in on the bottom rack and increased the temp to 450. Sure enough, the tomatoes cooked quickly. But we also found out that our new hardwired smoke detectors work. The hot olive oil splattered all over the bottom of the oven, filling our kitchen with smoke. Ooops.

Anyway, this dish is such a treat and it is a great answer to the steamed vegetable rut that I get into. You know, throw some frozen green beans into a microwave safe dish with a dash of water and nuke for 3 minutes. These tomatoes are zesty and a bit sweet, and burst with flavor in your mouth. For a different serving idea t
hrow some diced peppers alongside the tomatoes in the oven and toss with pasta and some fresh basil. You won't be disapointed.

Monday, September 21, 2009

White Bean Salad *melissa

Lunchtime rolled around today and nothing in the frig appealed. So, I searched my cabinets and found a can of cannellini beans. Then I searched my produce drawer and found some choice ingredients that I thought might go together.
Here's what I ended up with:
1 can cannellini beans, drained/rinsed
2 chopped roma tomatoes
1 stalk celery (w/ leafy bits) chopped
2 scallions chopped
a bit of mint, chopped
juice of 1/2 lemon
1 Tbsp olive oil
sea salt to taste
fresh cracked black pepper
sprinkle of Parmesan cheese

Now, once in a while when I make things up out of my head it can produce a gross disaster. I'm not a culinary professional, just a wife/sister/daughter/ friend who dabbles in (hopefully) tasty concoctions.


Drain & rinse
the beans...


Then, julienne the mint and chop the celery...

(*TIP* How to julienne! Chopping leafy herbs like mint and basil can be annoying, like how they stick to your fingers and the cutting board....make it easier by stacking the leaves on top of each other and then running your knife through the bundle.)


Chop the tomatoes, removing seeds and pulp


Chop scallions...


Juice half of the lemon and whisk with olive oil, sea salt, and black pepper


Pour over all ingredients
and toss together...


Lastly, sprinkle with shredded parmesean cheese, eat, and ENJOY!


Thursday, September 10, 2009

Peach Galette *melissa

Our labor day cookout presented me with an opportunity to exercise my weak baking skills once again. I came across this recipe on smitten kitchen.

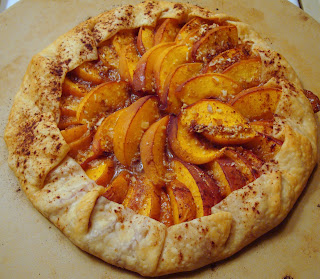
I need to tell you that this was SUPER easy and mouth wateringly delicious! Served warm with vanilla bean ice cream, my guests had that "more please" look in their eyes after the first bite. I scored some major points with the hubby too for this scrumptious treat.

Here are the few simple ingredients:
1 pie pastry round
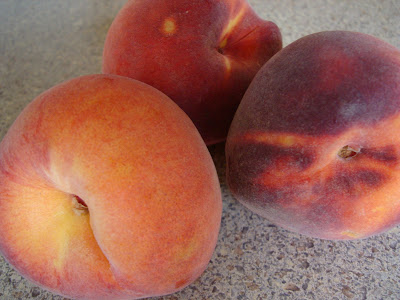
2 1/2-3 peaches
2 Tbsp melted butter
2 Tbsp crushed almonds
sprinkle of brown sugar
sprinkle of cinnamon
sprinkle of nutmeg

First, roll out the pastry dough. Now, folks, you can feel free to be super bakers and make your own pie pastry but again, I went with the store bought pastry to save time and honestly because I'm still too afraid to try it on my own. Brush pastry dough with melted butter...


Then, sprinkle with cinnamon, nutmeg, almonds and brown sugar to the center of the dough leaving about two inches around the edge....


Now, slice those peaches! Arrange them on their bed of doughy sugary goodness....


Then, take the edge of the pastry dough and fold it around the peaches, pinching in places. Brush outside of dough with melted butter and in folds of pastry brush some extra butter to keep it in place. Sprinkle more cinnamon, nutmeg, almonds and brown sugar over top...


(Psssst! Don't use a baking sheet with holes like I did...not a good idea...Can we pretend it didn't happen? If the baking police come for me the evidence is in the pictures. For now I hope we can get past it and make better choices in the future.) I happened to make 2 of these and made the other one on my pizza stone...a much better choice b/c it tends to get a little gooey on the bottom.

Bake at 350 degrees for about 25-30 minutes or until the sugar starts to bubble on top. Enjoy as the enticing cinnamony peachy aroma will waft out of your kitchen and fill your whole house.


Serve warm,
with vanilla
ice cream...

ENJOY!


p.s. This post is dedicated to my sister Heather, her favorite summer fruit being peaches, and to her precious new little baby, Jillian, who she calls her little "peach blossom."

Wednesday, September 2, 2009

Crimson Pie *Melissa

Now, this is one of Nate's favorite desserts, second to apple crisp, of course. This pie is made frequently for Holidays in the Green household. I pass it on to you as it was passed on to me from Nate's mom. She always makes sure to tell me, "Now, don't feel like you have to make this exactly the way I do! You can make it however you like."

So! Since I've made it a few dozen times since we've been married I have made one slight modification but otherwise this is an easy and beautiful pie that is sure to impress and delight the taste buds.

I recently made two crimson pies for a large group of people so I made one with a slivered almond top and the other with a crust top.

4 cups blueberries (1 1/2 reserved)
12 oz cranberries (not dried)
1/3 orange (minced with rind)
1/2 cup sugar
1 Tbsp cornstarch
1 Tbsp butter
pie pastry (I cheated to save time and used store bought pastry dough)
slivered almonds

Set oven on 400 degrees. Mince orange, rind included. Mix with berries in large heavy-bottomed pot. (You can use any large pot you have but if it doesn't have a heavy bottom make sure you babysit the berry mixture so it doesn't burn.


Stir in cornstarch and sugar. On stove top, bring berries to a gentle boil to activate corn starch, stirring constantly. This is when the CRIMSON happens!


Prepare bottom pie crust in pie plate and fill with berry mixture, mounding in center. Mix in reserved blueberries.


Now, time to prepare the pie top. I made one pie with a pastry top and another with slivered almonds on the top.


For the pastry top roll out the dough and made cut outs of any shape of your choosing. My mom usually does an oak leaf cut out for fall pies. I went with a star since Memorial Day is right around the corner. Brush pie top with milk so it gets nice and golden in the oven.


For the slivered almond topping just sprinkle over berry mixture then place pats of butter around so that when the pie goes in the oven the almonds toast up to a mouthwatering brown color.


Bake pie for 45-50 minutes or until filling begins to bubble up. **Place in oven on foil or baking sheet b/c the filling can bubble over a bit. Enjoy your hot pie with vanilla ice cream! mmmmmmmm !